UM Vendor Onboarding - Complete Flow Guide
Version 3.2 introduces the UM (Utilization Management) Vendor role in the SAFHIR Registration Portal. This guide covers how a UM Vendor registers an account, logs in, and creates an application — from the first page load through to an active application on the dashboard.
UM Vendor Registration Flow
A new UM Vendor visits the portal and creates an account. They fill in their organisation and contact details, verify their phone number via SMS OTP, and land on the dashboard once MFA is confirmed.
Navigate to Registration Page
User opens the portal and clicks "Register as UM Vendor" or navigates directly to the registration URL.
Page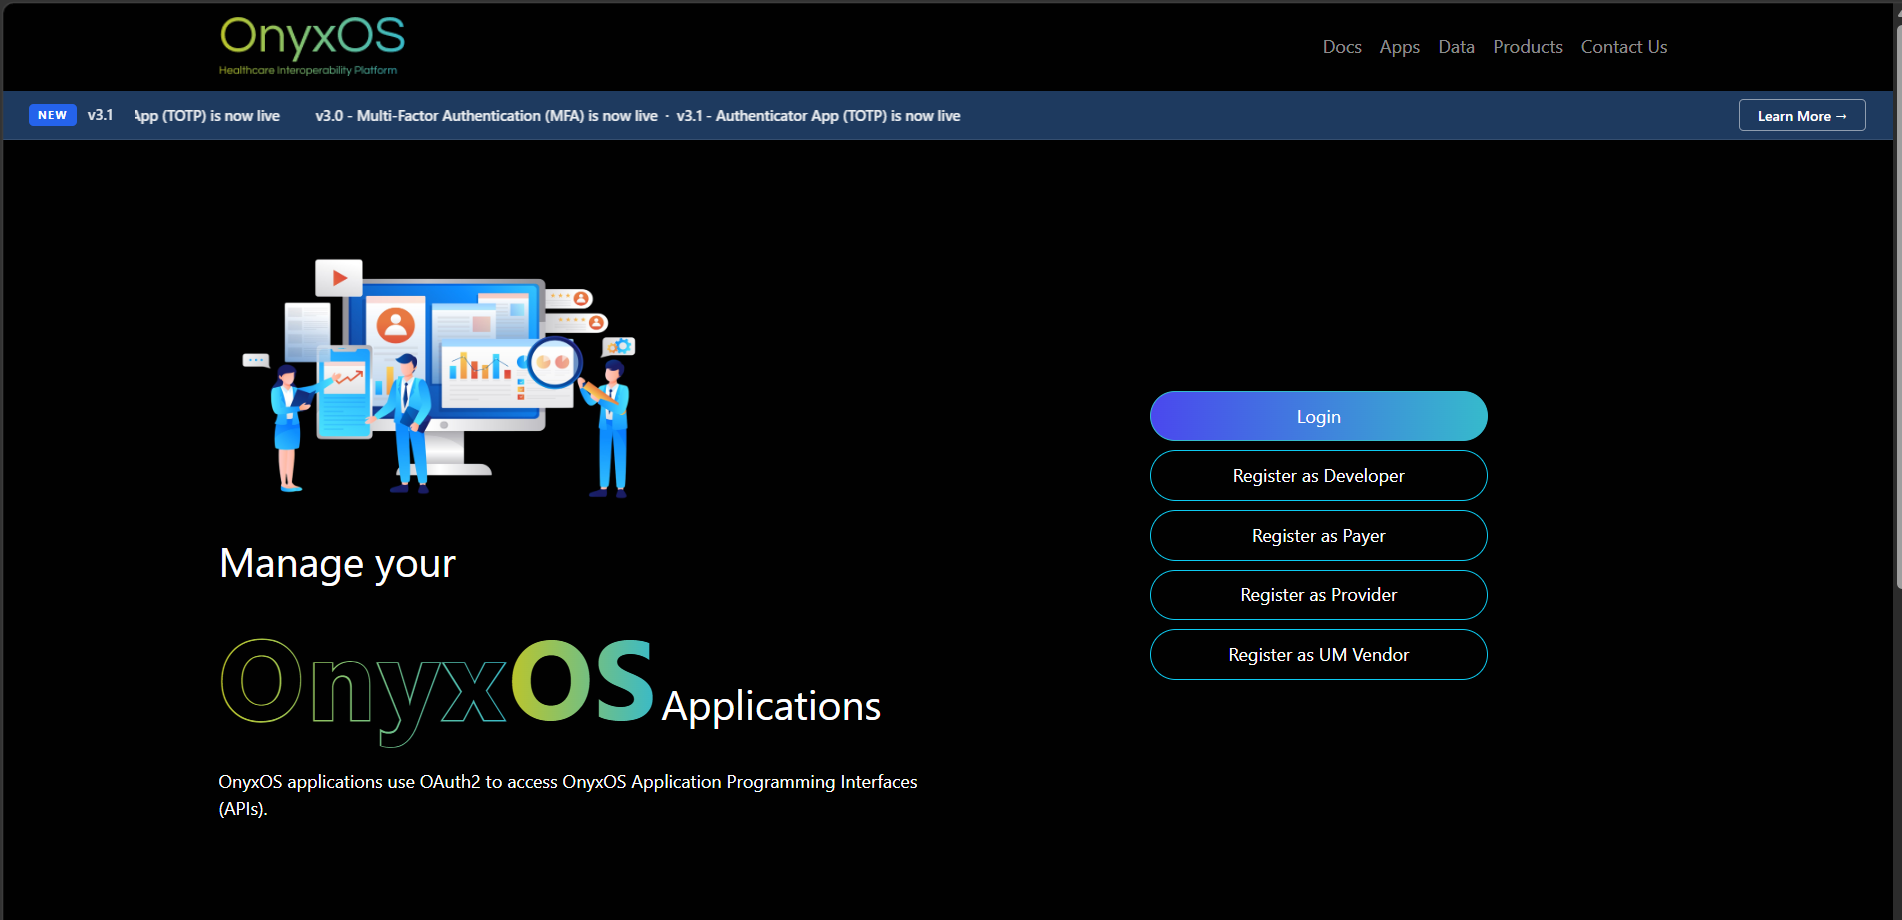
The public registration page is displayed. The user clicks "Register as UM Vendor" and is presented with the Terms and Conditions. The user must agree to the terms before proceeding with the registration form.
Fill in Account Details
User enters first name, last name, email, password, and phone number. All fields are required.
User action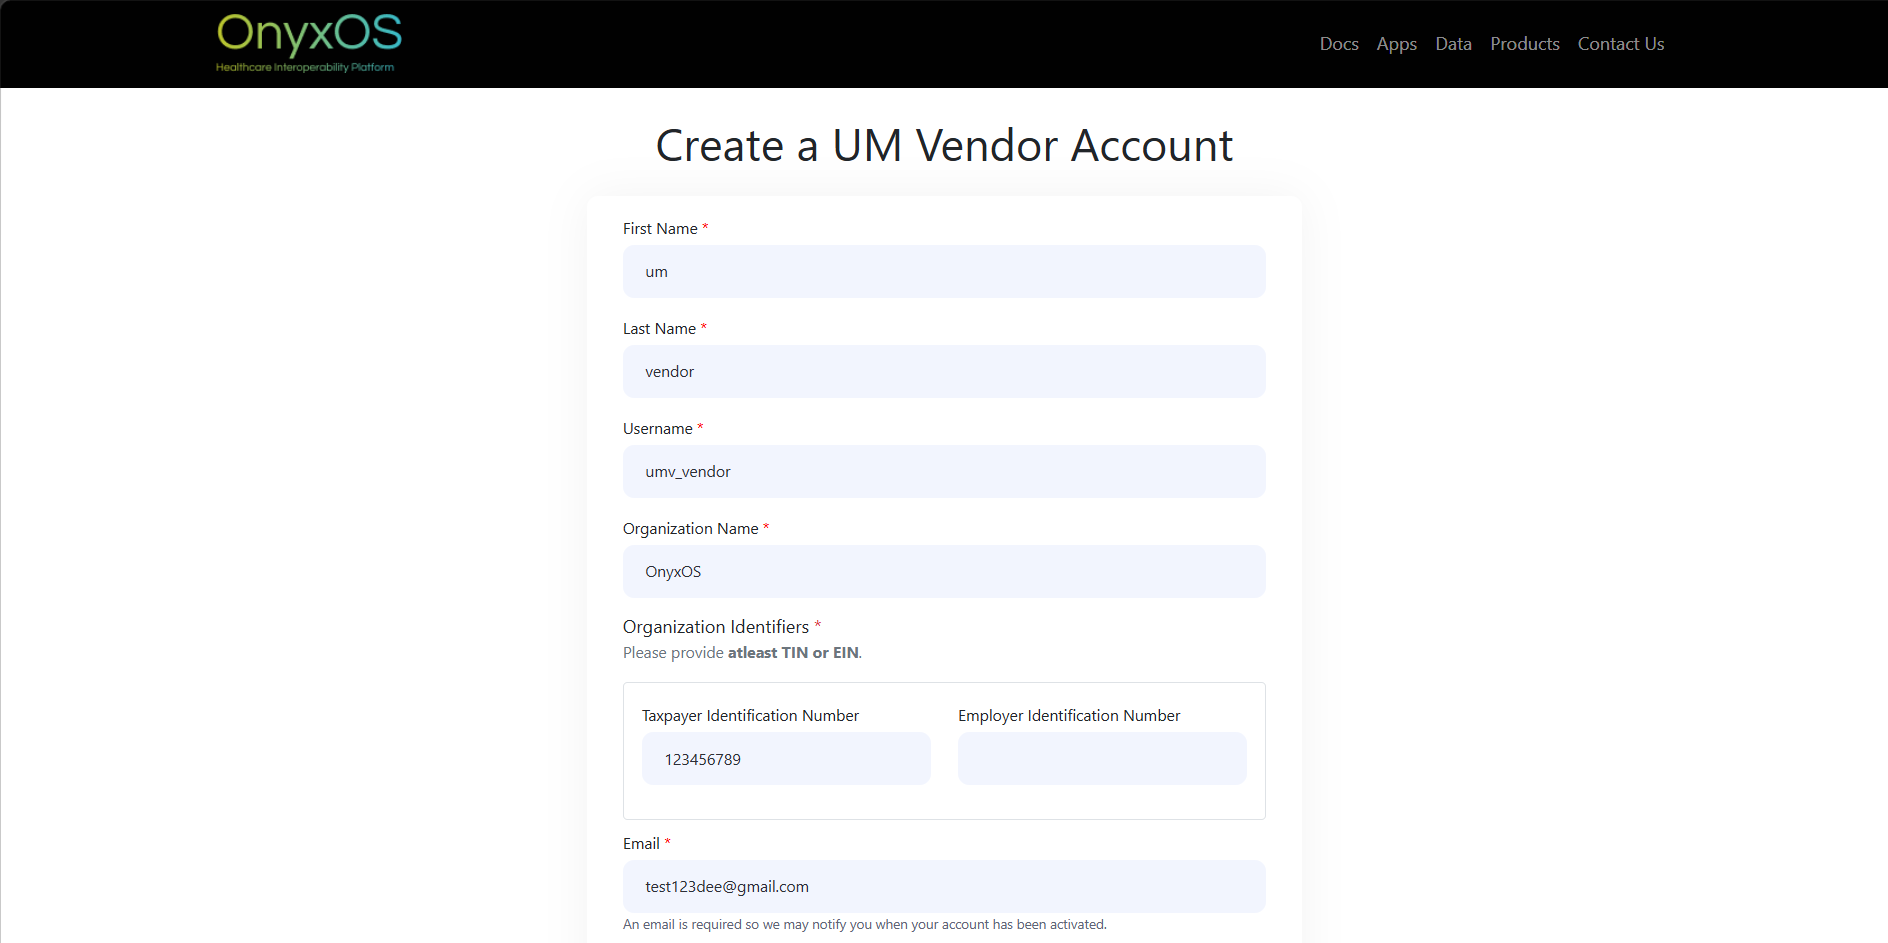
A form with inputs for name, email address, password, and mobile phone number. The phone number must be a valid mobile number as it will be used to send a verification code in the next step.
Send OTP to Phone
User clicks "Send OTP". A 6-digit code is dispatched to the provided mobile number.
Verification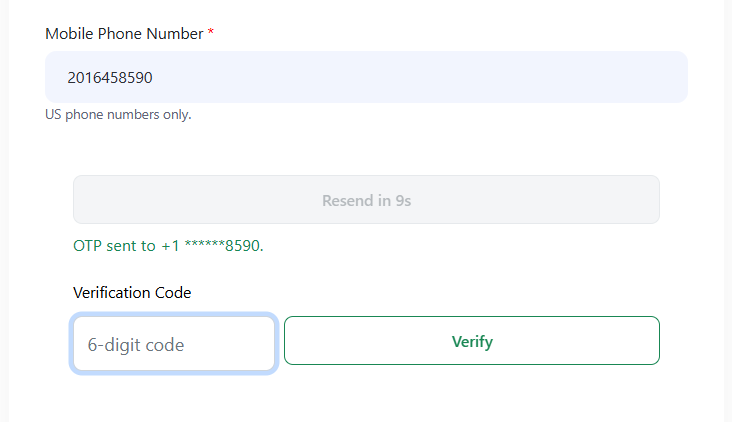
A 6-digit verification code is sent to the provided mobile number. An input field appears on screen for the user to enter the code, along with a countdown timer showing how long the code remains valid. The "Resend" button becomes available again once the cooldown period ends.
Enter OTP & Verify
User types the 6-digit code received by SMS and submits. Portal verifies the code.
Verification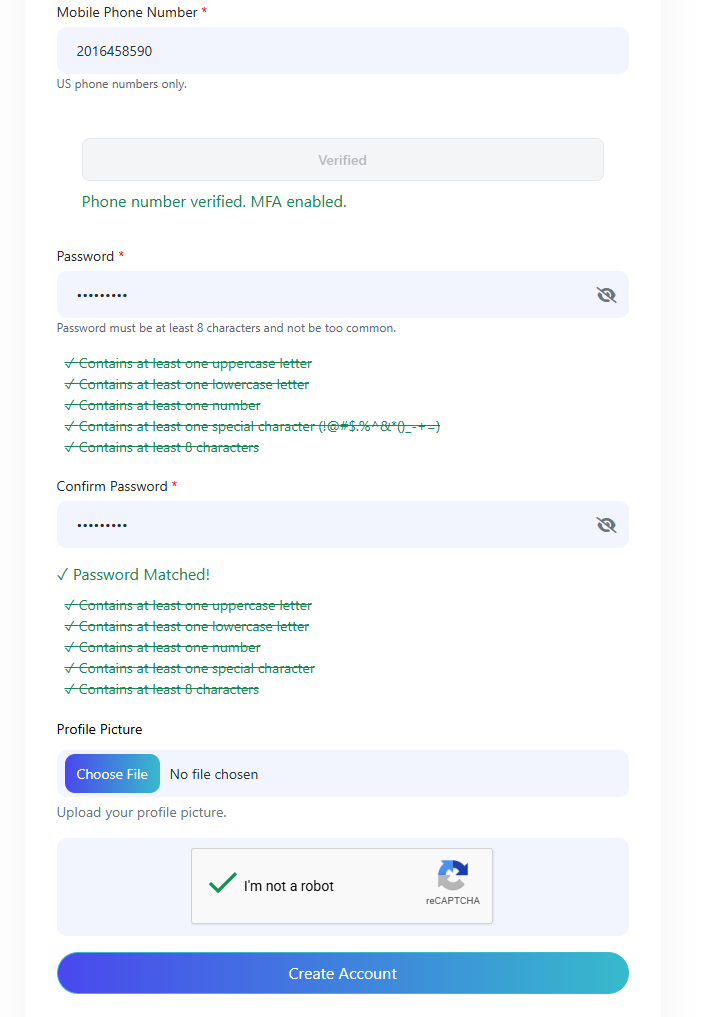
Once the correct code is entered and submitted, the account is created. An activation email is sent to the registered email address. The user must verify their email before they can log in to the application.
A "Invalid code. Please try again." error is shown inline. The form is preserved and the user can retry without restarting the flow. After too many failed attempts the phone number is locked for a cooldown period.
Email Verification
A verification email is sent to the registered address. The user clicks the link in the email to verify their email address.
Email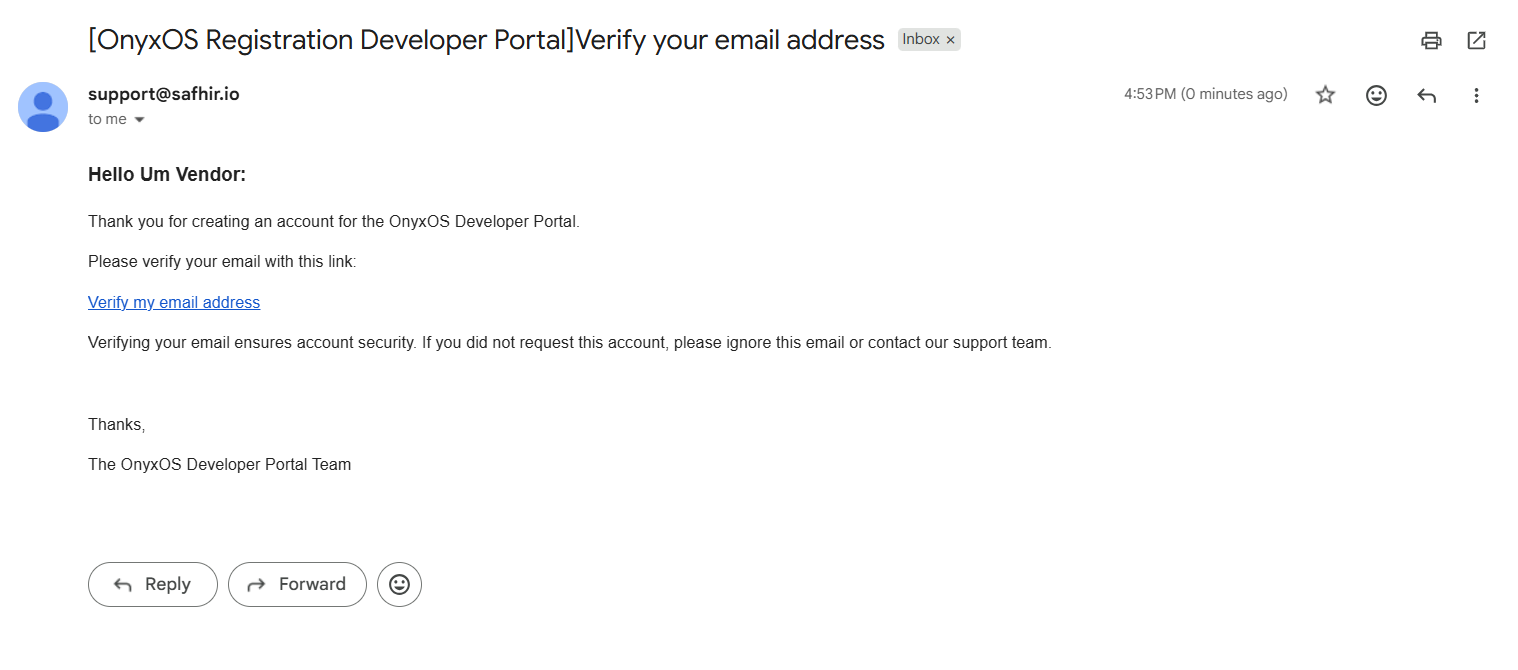
The user receives an email at the address provided during registration containing a verification link. Clicking the link confirms their email address. This step verifies email ownership only and is separate from account activation.
Account Activation & Admin Confirmation
The user activates their account. The admin sends a confirmation email, after which the user can log in with their credentials and MFA to access the dashboard.
Done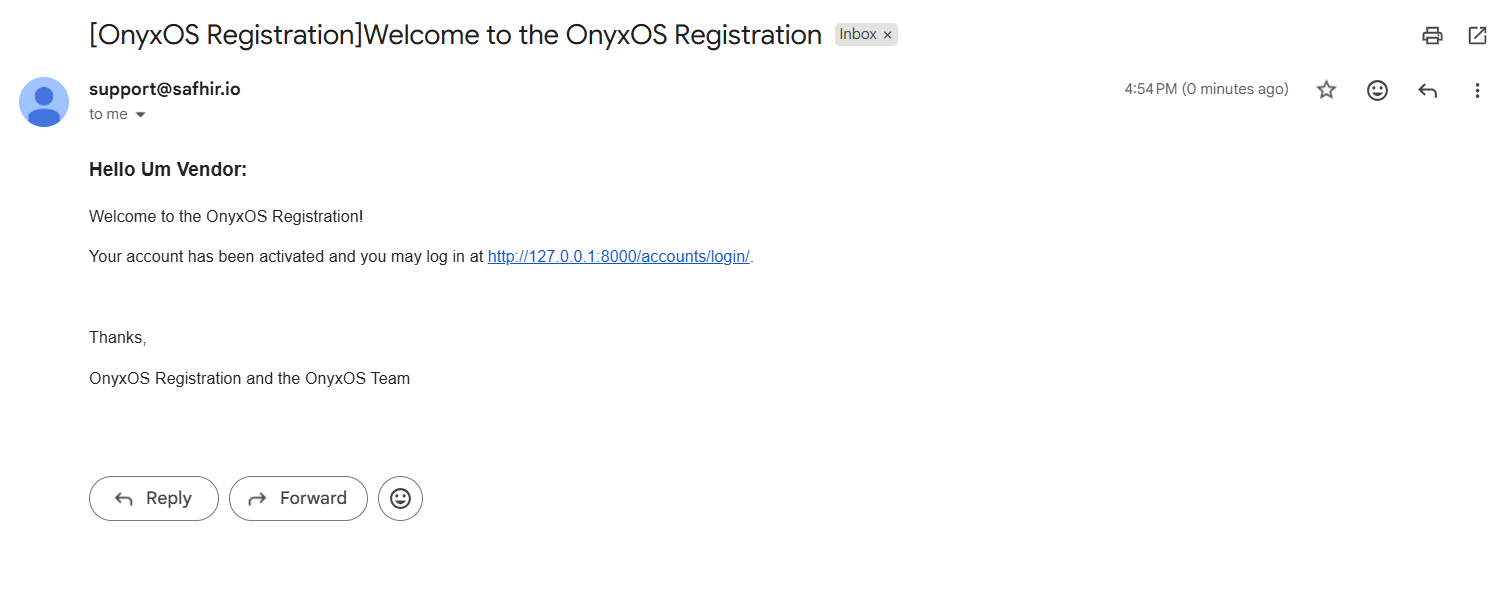
After verifying their email address, the user activates their account. A confirmation email is then sent from the admin notifying them of successful activation. The user can now log in using their credentials and complete the MFA step to access the dashboard.
The UM Vendor account is fully active. Upon receiving the admin confirmation email, the user logs in using their credentials and completes the MFA verification to access the dashboard.
UM Vendor Login Flow
A registered UM Vendor returns to the portal and signs in. After a valid username and password, the MFA challenge is triggered and the user verifies via SMS OTP before reaching the dashboard.
Navigate to Login Page
User opens the portal and navigates to the login page.
Page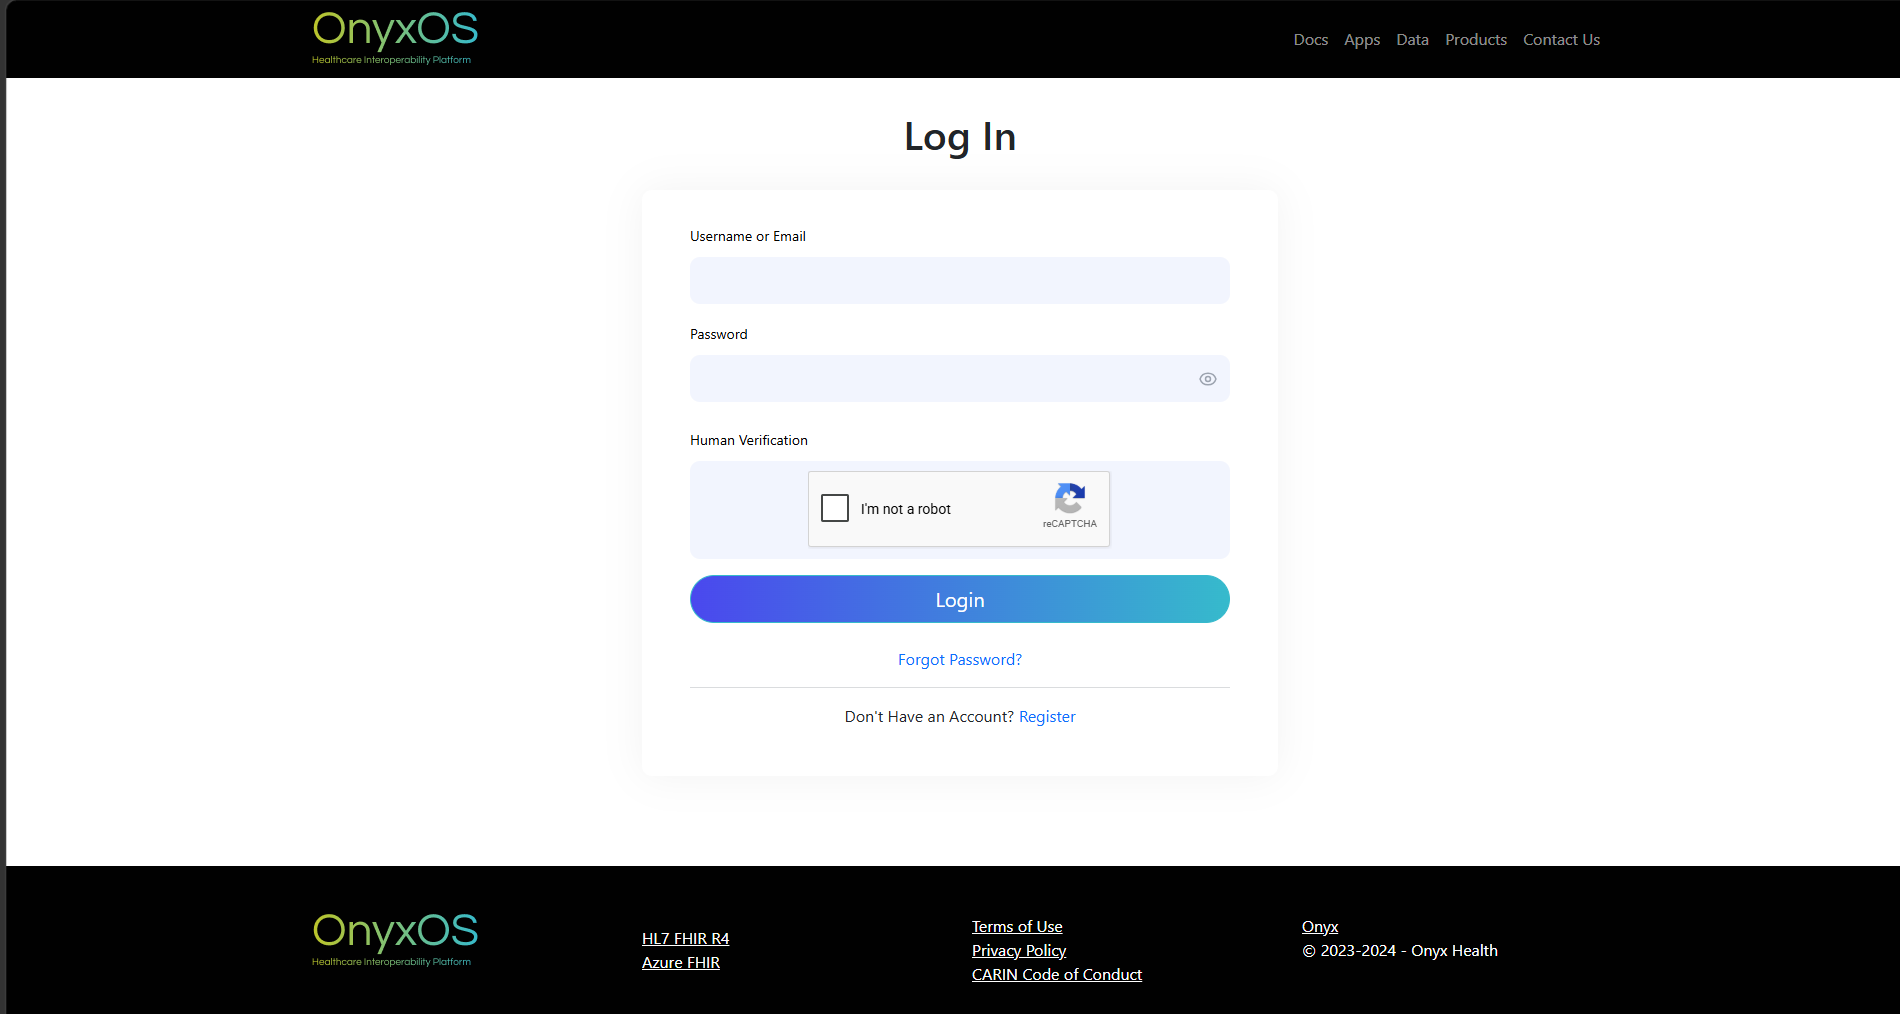
The standard login form with username (email) and password fields. A "Forgot password" link is available. No role selection is required at login — the role is determined from the stored account record.
Enter Email & Password
User enters their email and password and clicks Sign In.
User action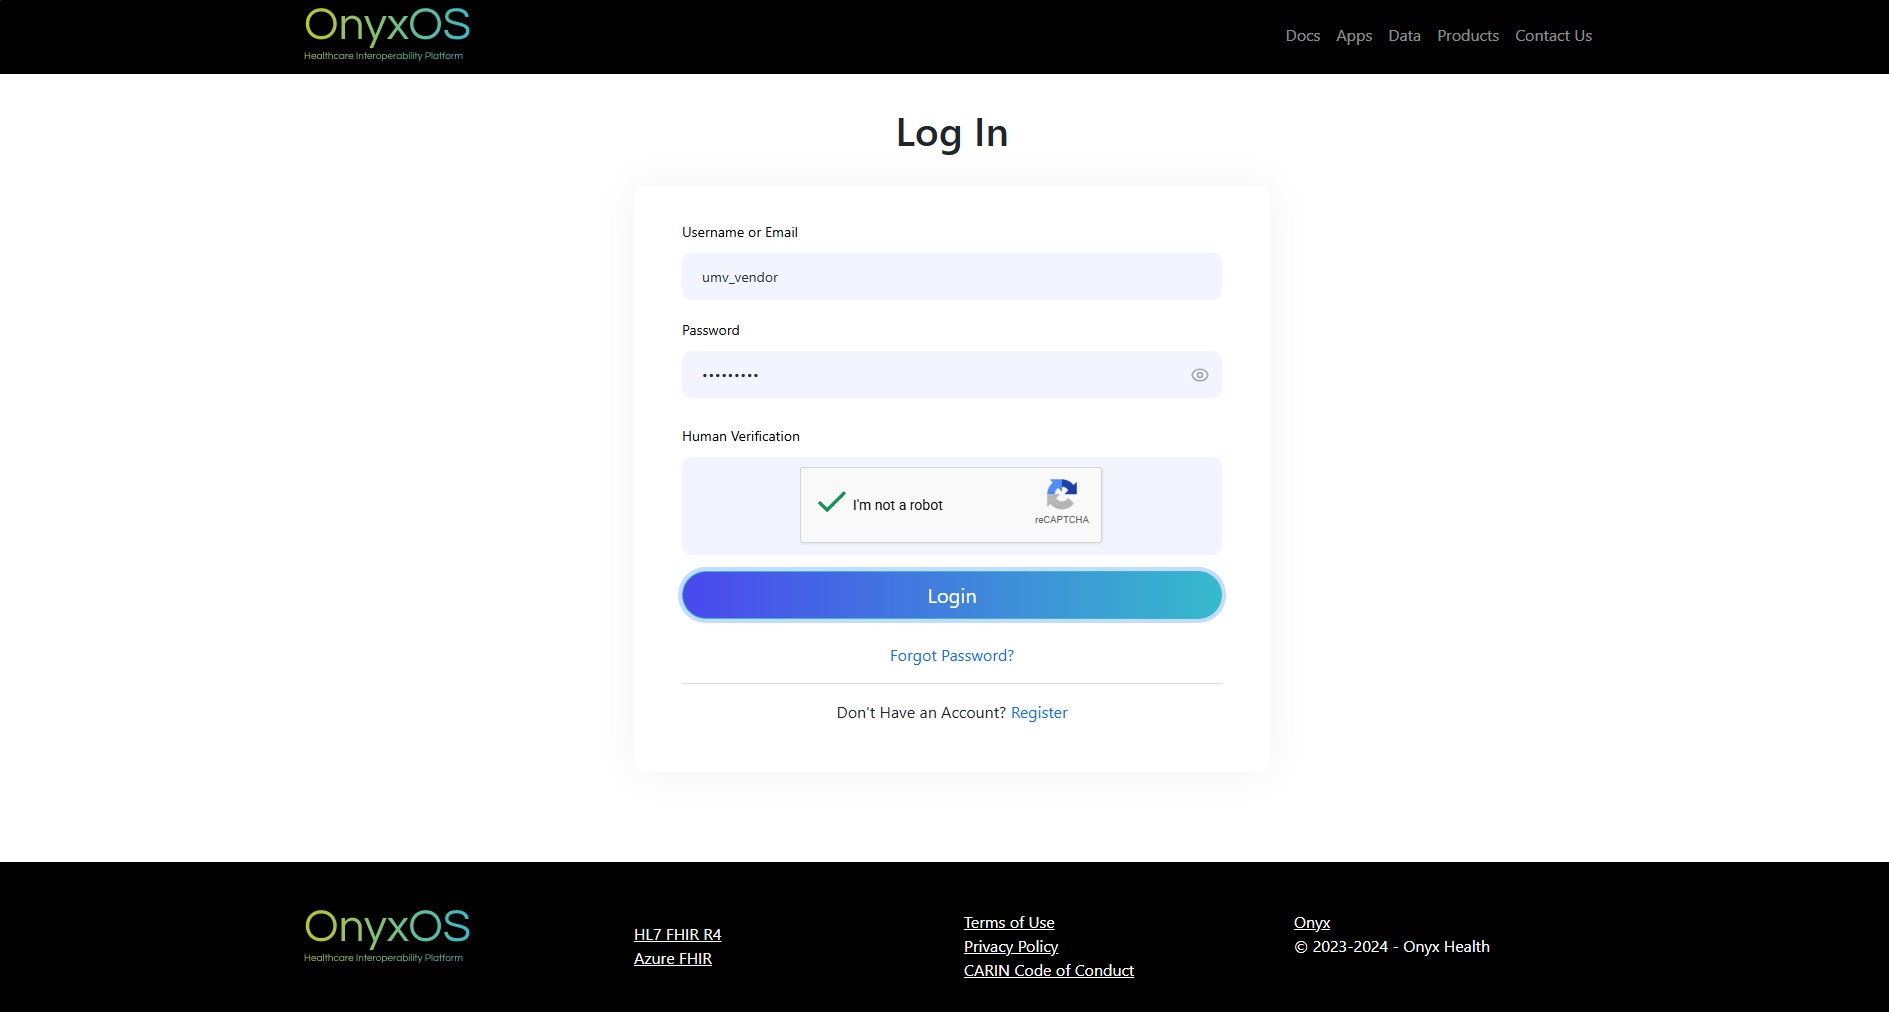
If the credentials are correct, the user is prompted with a verification step before gaining access to the dashboard.
Choose Verification Method
A modal prompts the user to select their verification method — either SMS or Authenticator App (TOTP).
Modal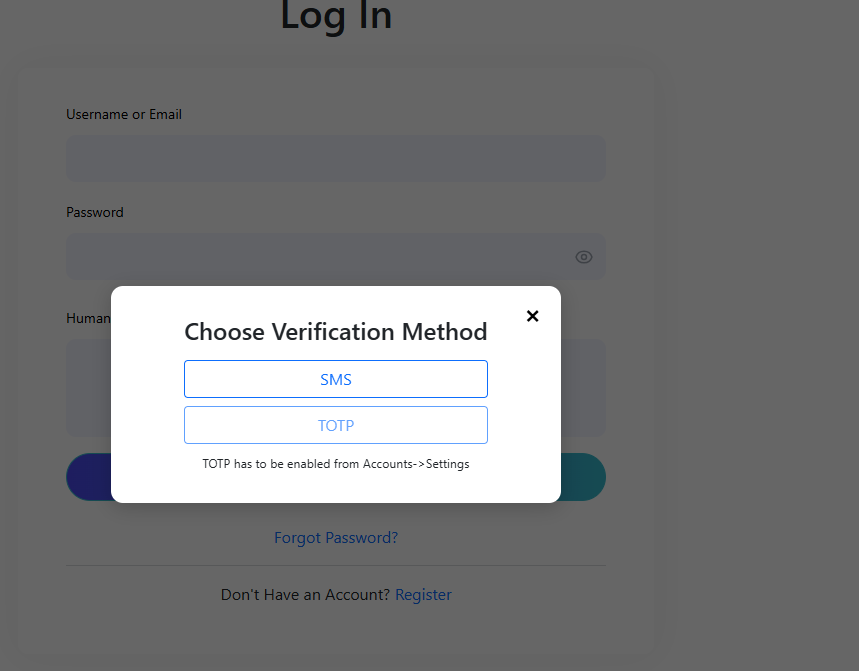
The verification method modal presents available options based on the account configuration. SMS is always available for UM Vendor accounts. If TOTP is also enrolled the authenticator app option is shown as well.
OTP Sent & Code Entry
A verification code is sent to the user's registered mobile number. The user enters the 6-digit code to proceed.
Verification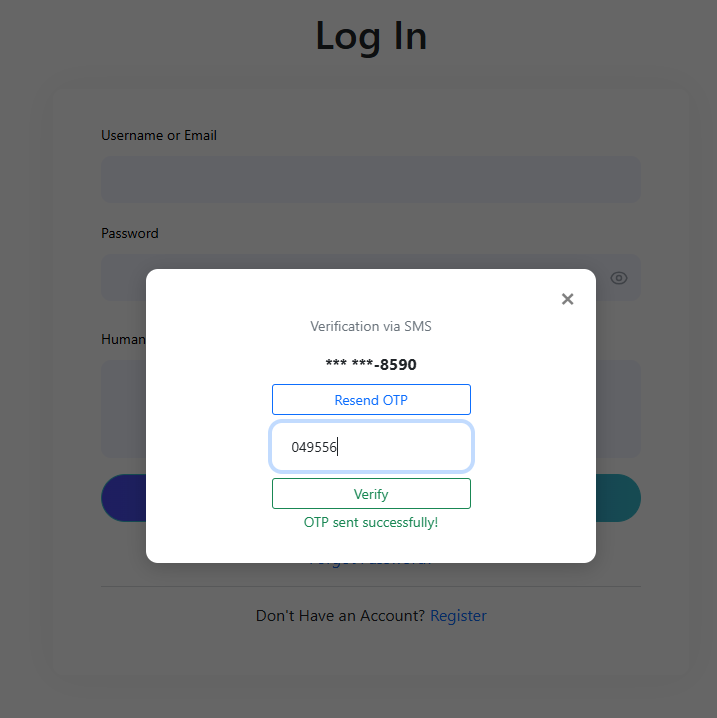
The user enters the code received on their mobile number. Once verified, the user is logged in and redirected to the dashboard.
Login Complete & Dashboard
Session is fully authenticated. User is redirected to the UM Vendor dashboard.
Done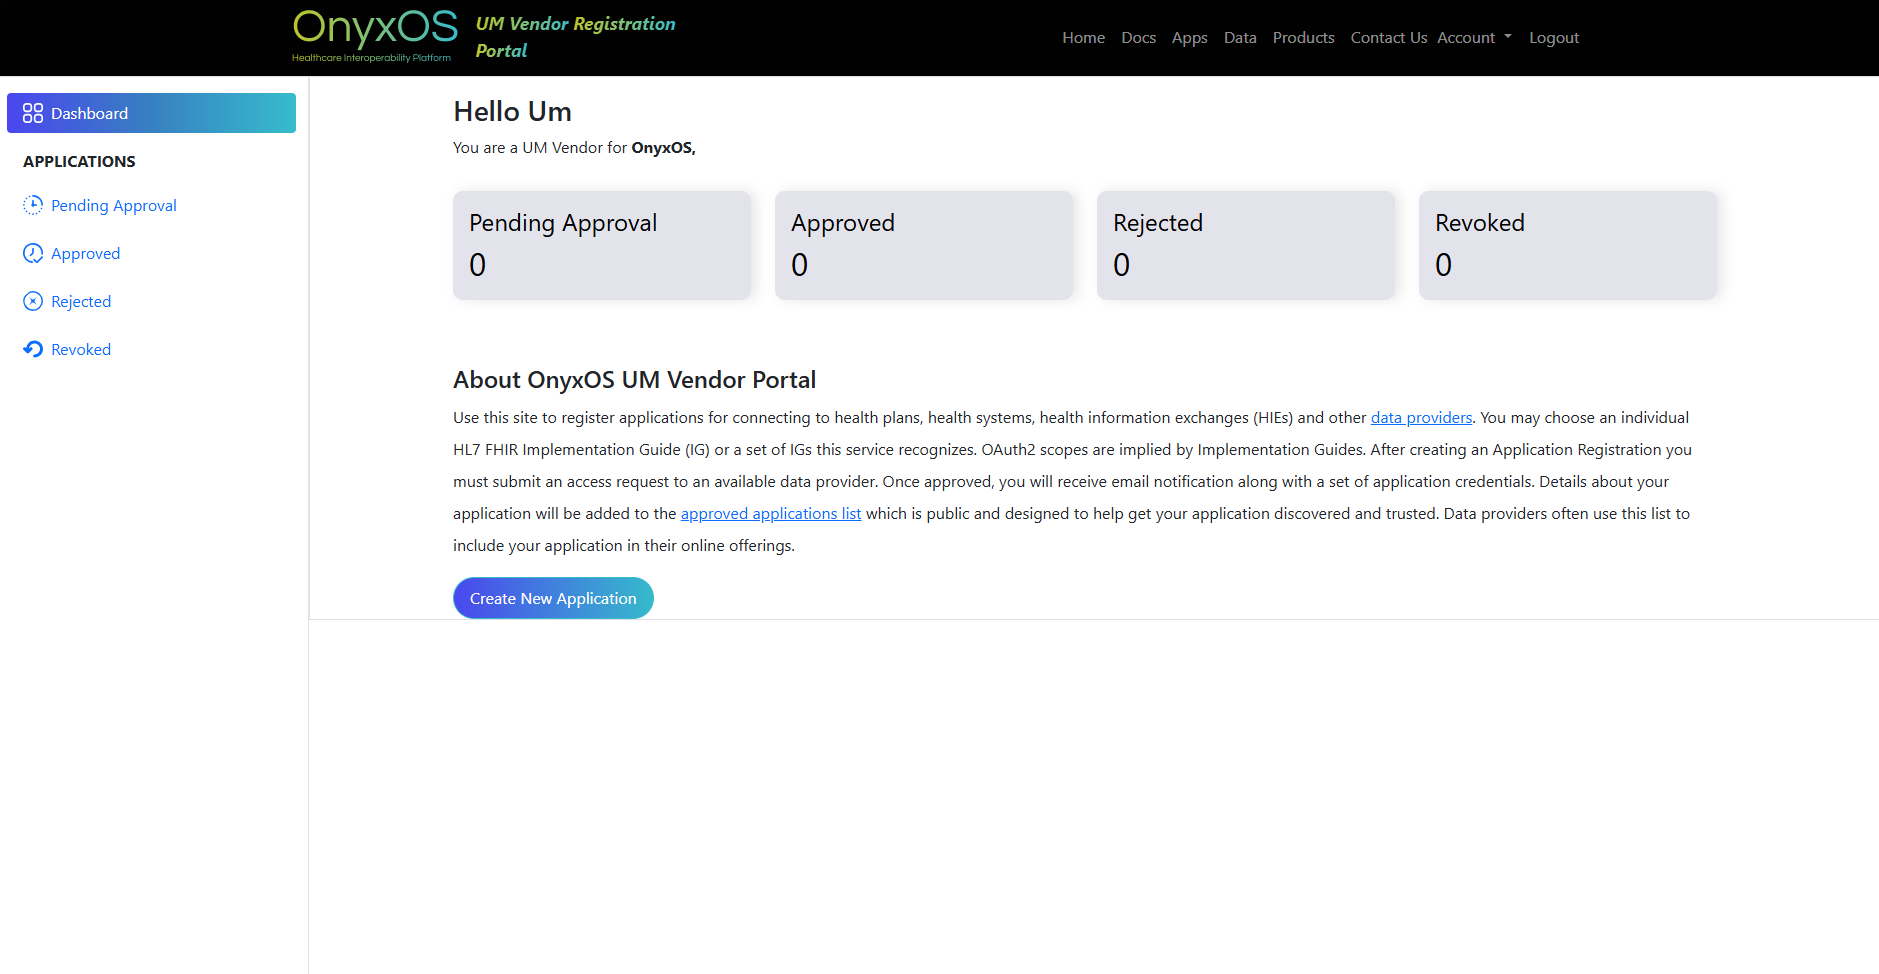
The user is successfully signed in and redirected to the UM Vendor dashboard.
Application Creation Flow
A logged-in UM Vendor creates a new application from the dashboard. They fill in application and client details, complete the access request by choosing a data provider and IG, and submit. The application goes through a payer admin review before credentials become available.
Click "Create Application" on Dashboard
The UM Vendor dashboard shows a "Create Application" button. Clicking it starts the application creation flow.
Page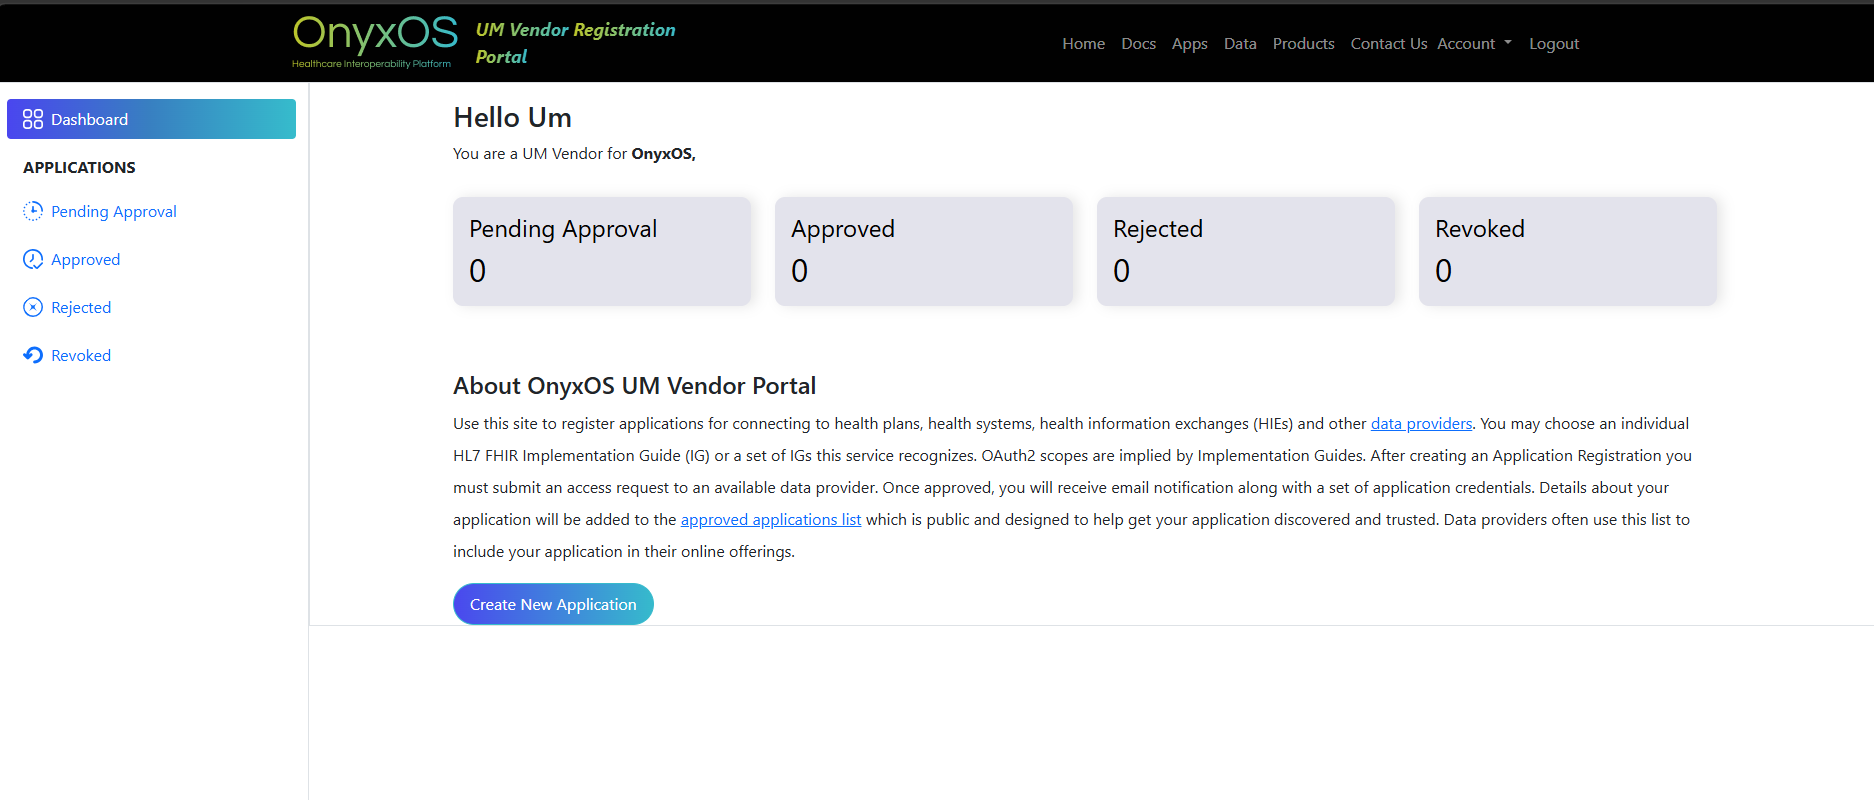
The dashboard displays existing applications (if any) and a "Create Application" button. For a new UM Vendor with no applications, the empty state guides them directly to the creation form.
Fill in Application Details
User provides the application name, description, and organisation details.
User action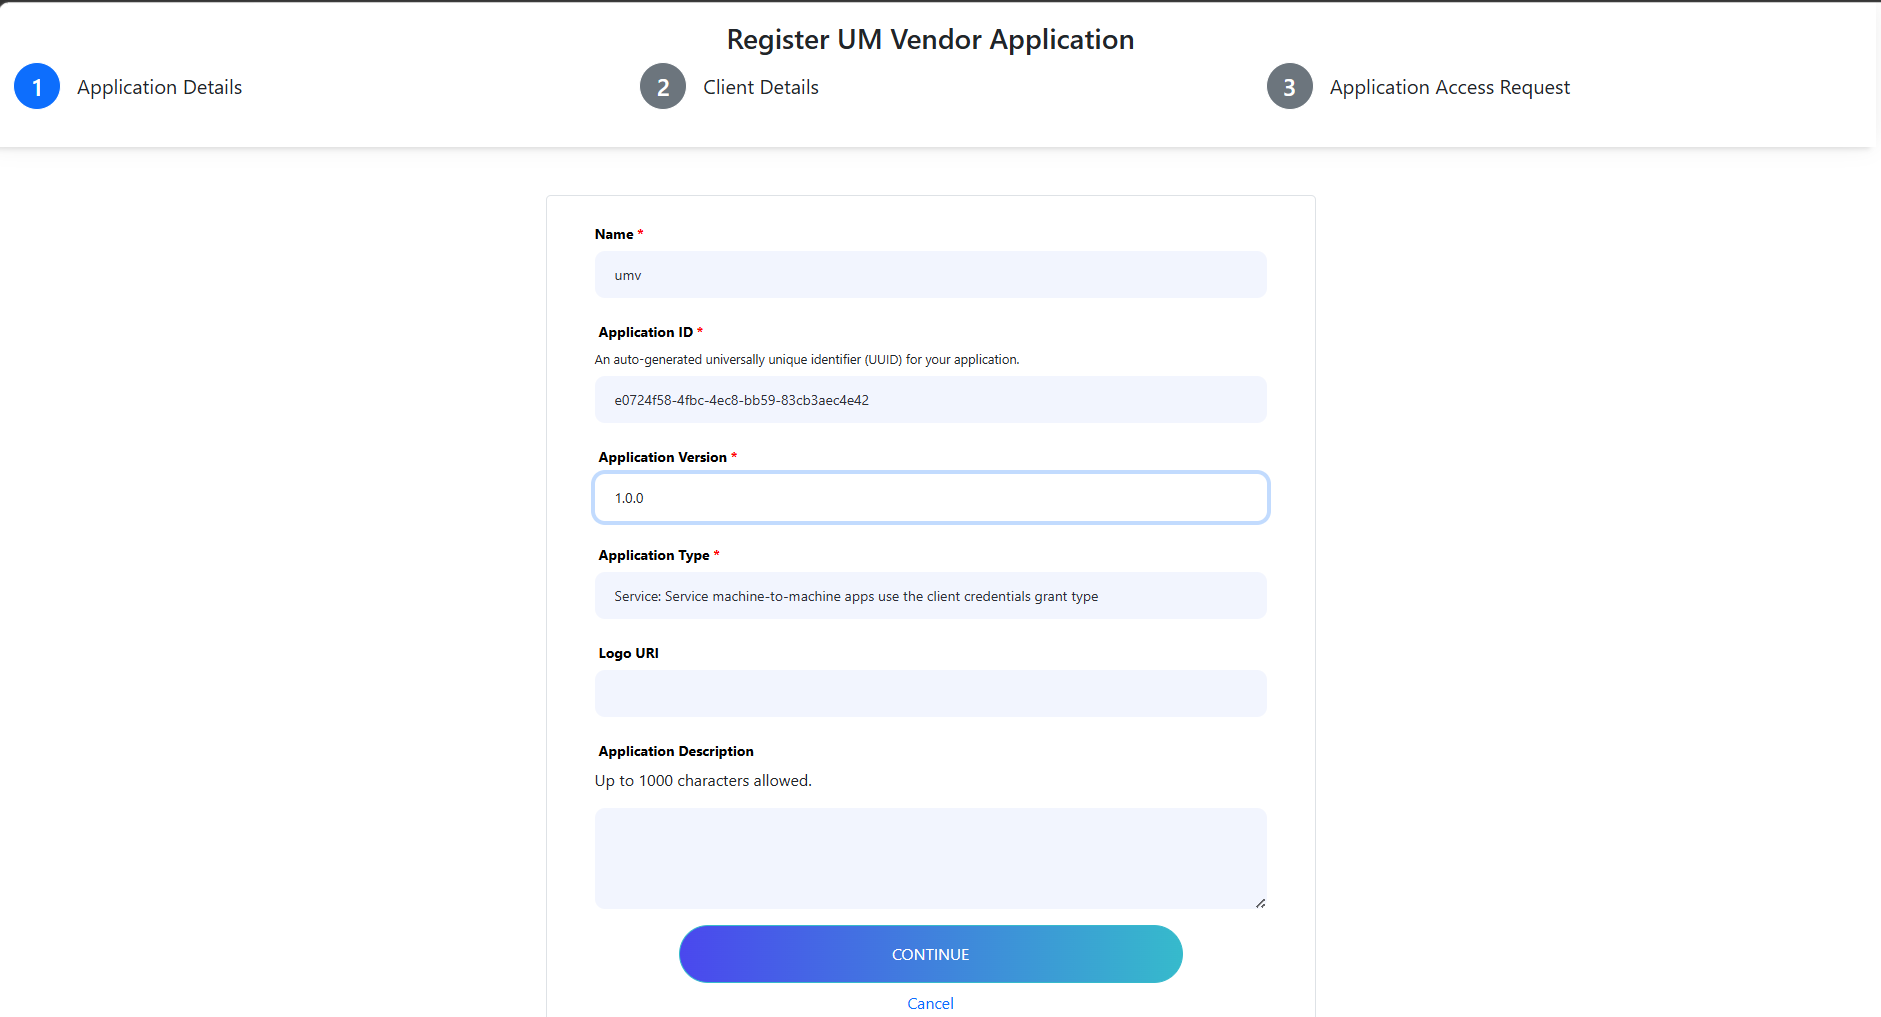
A form with fields for Application Name, Application Description, and Organisation / Company Name. All fields are required before proceeding to the next step.
Fill in Client Details
User fills in the client-specific information required for the application.
User action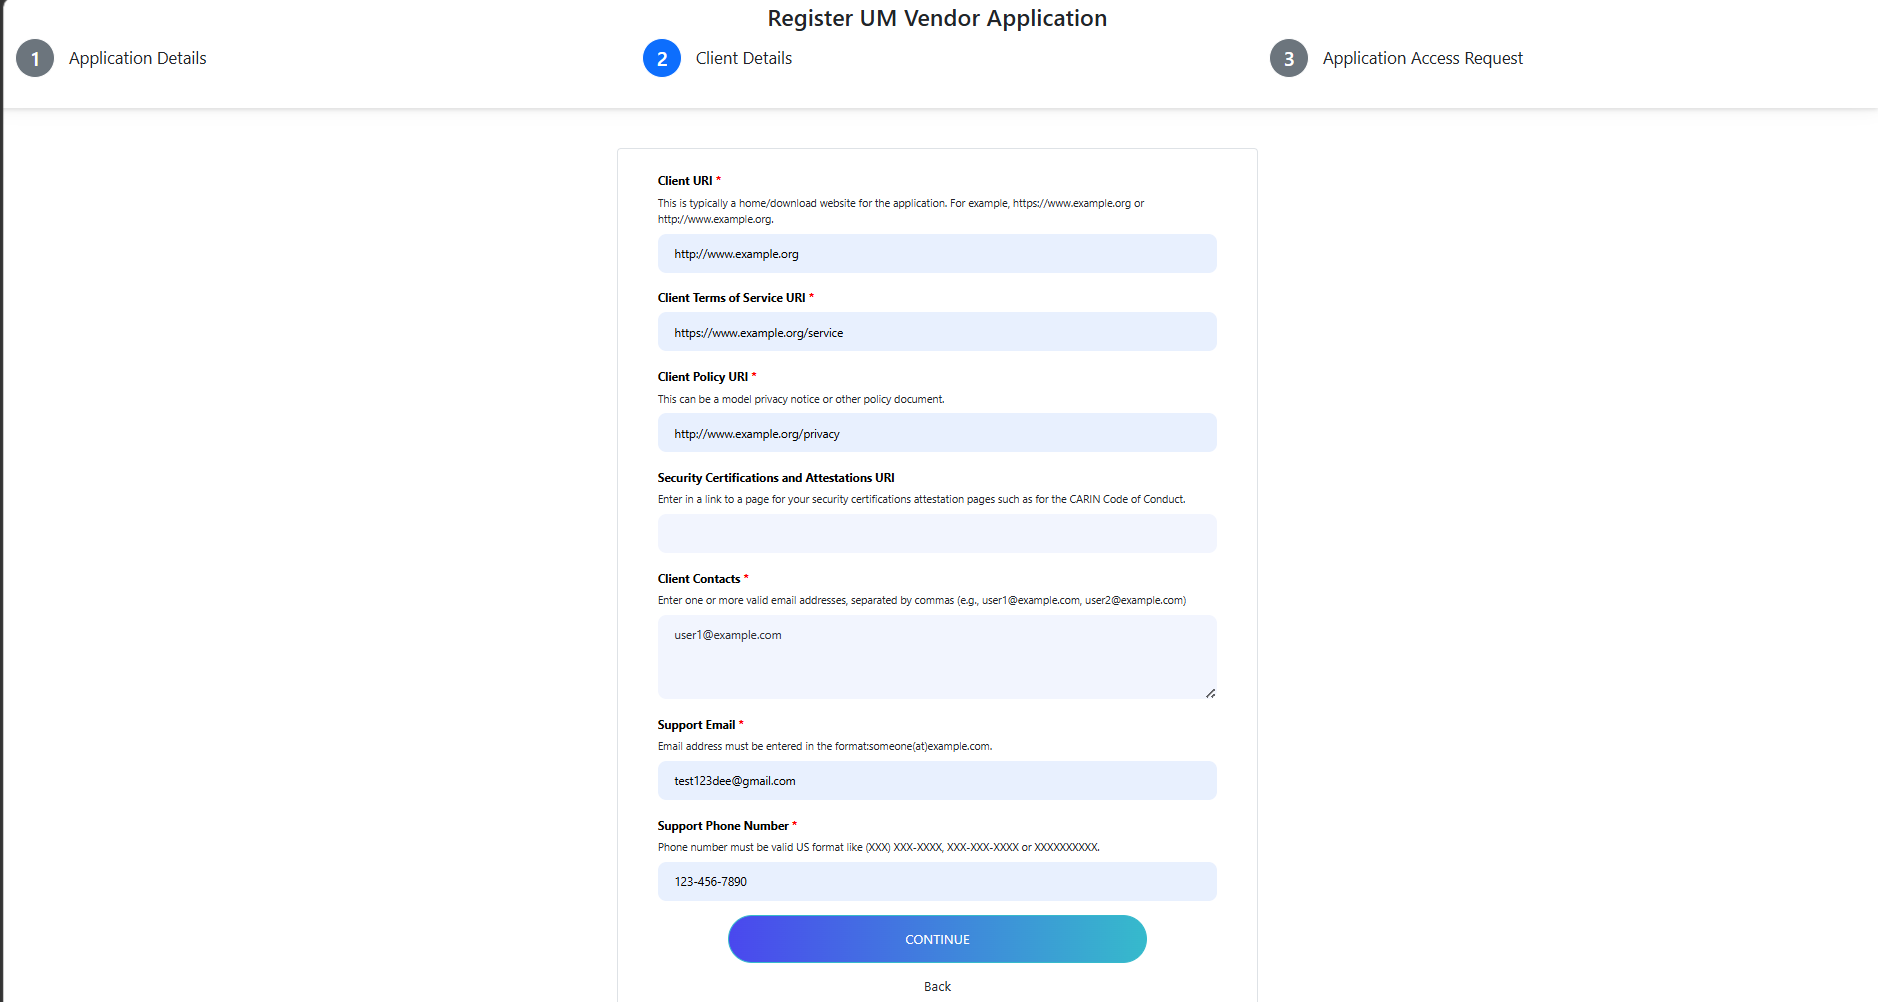
A form to enter client details for the application. All required fields must be completed before moving on to the access request step.
Application Access Request
User selects a data provider, chooses an implementation guide (IG), and clicks "Complete Application Request" to submit.
User action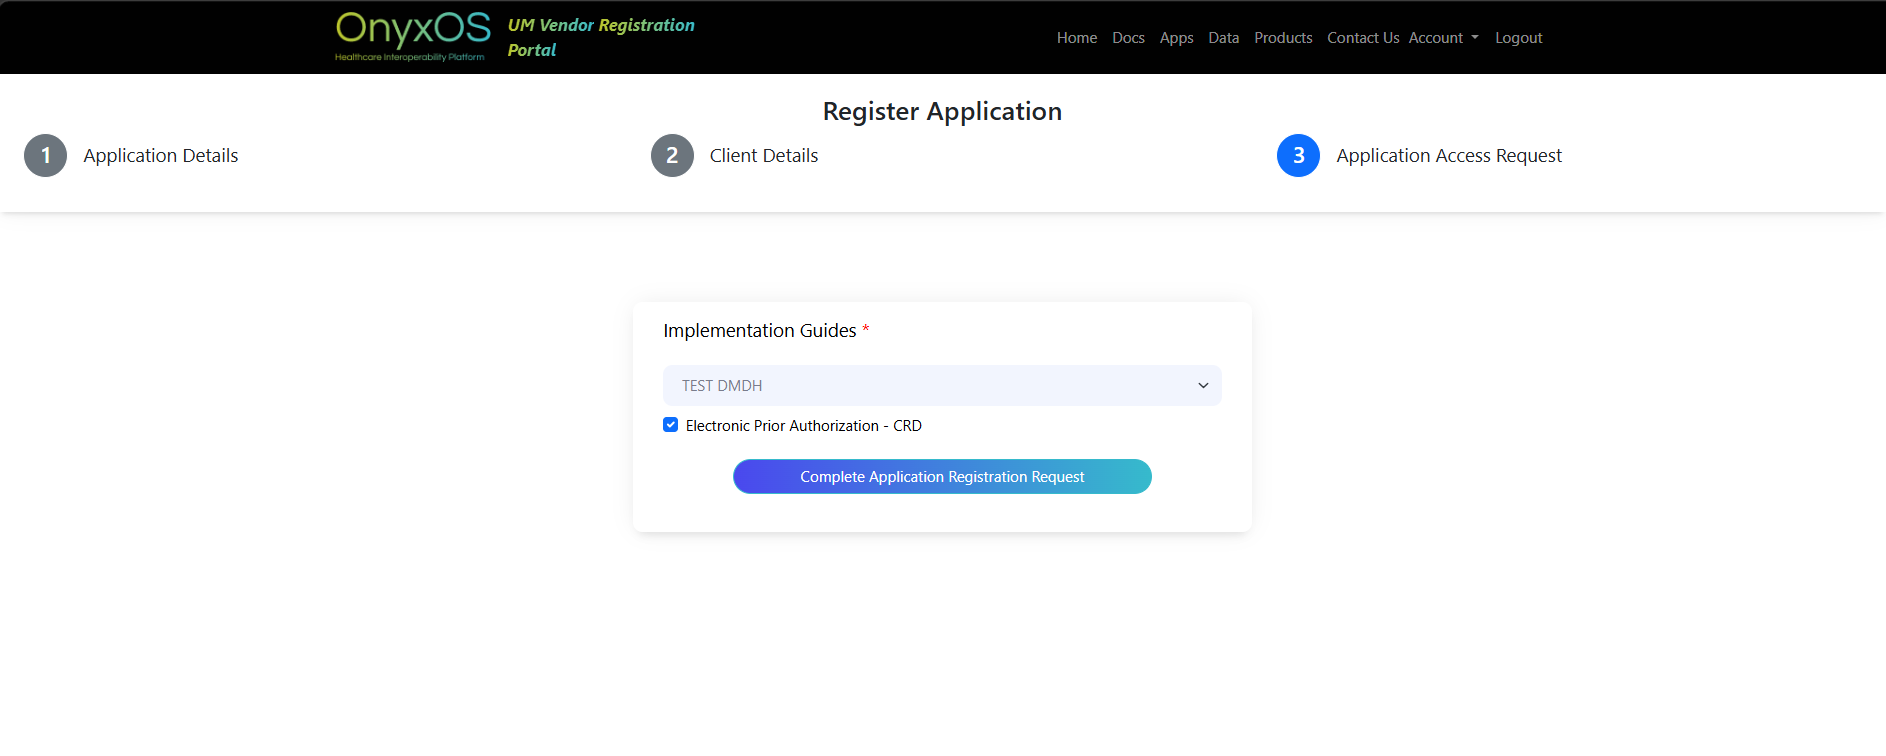
The user selects the Data Provider they want to connect to, then selects the Implementation Guide (IG) applicable to their use case. Once both are selected, the user clicks "Complete Application Request" to finalise and submit the application.
Application in Pending Status
The submitted application appears in the dashboard under the Pending tab awaiting review by the payer admin.
Verification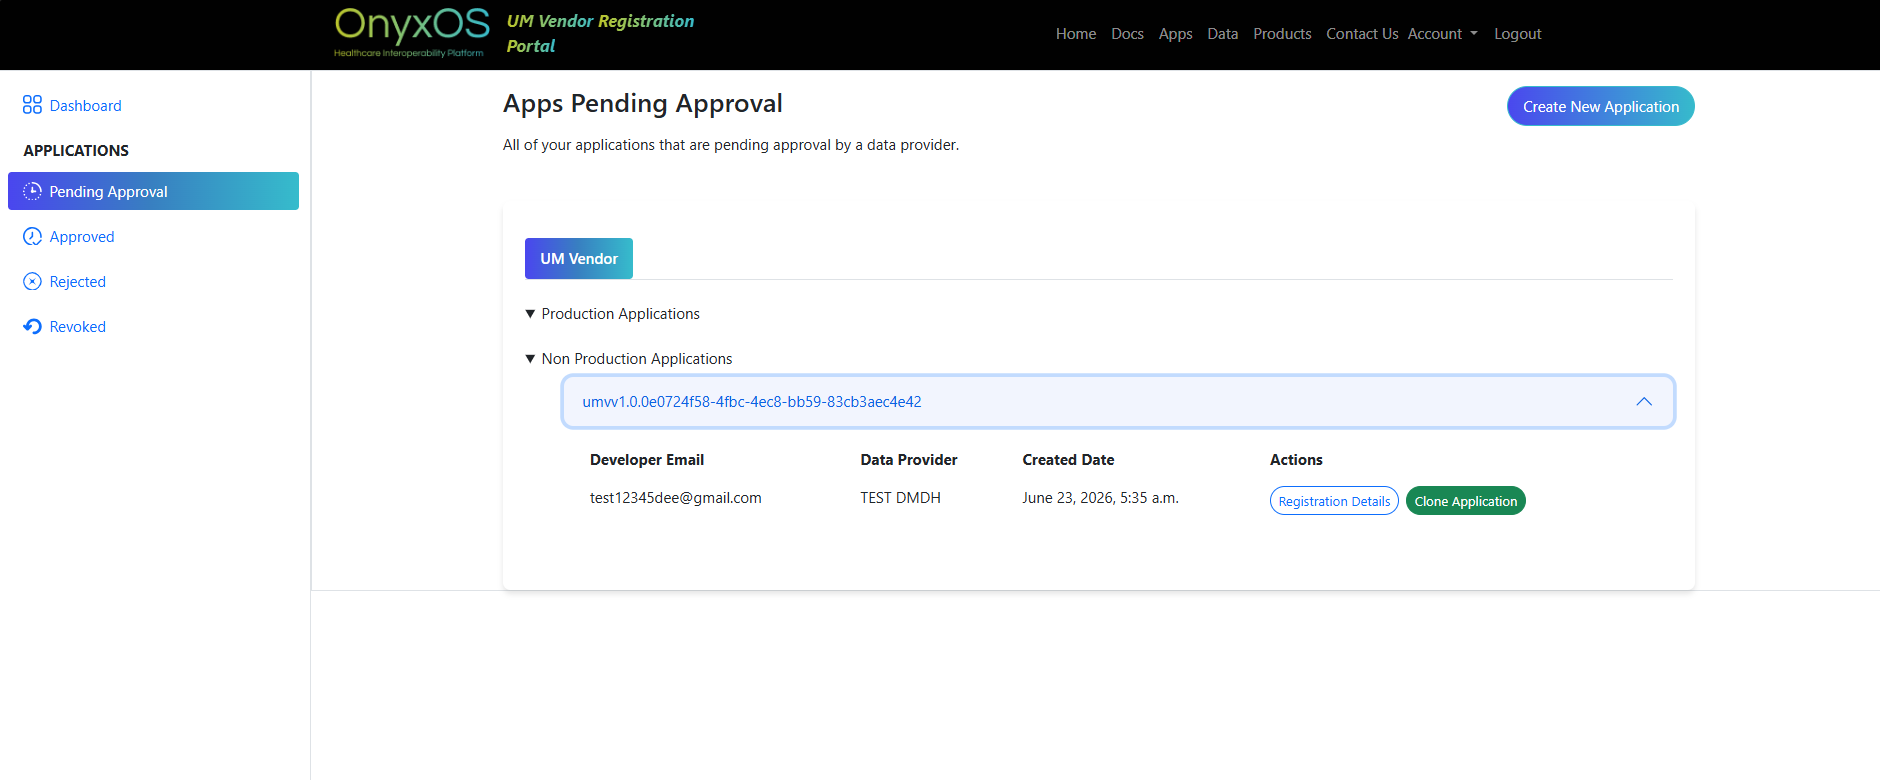
The application is listed in the Pending tab on the dashboard. No action is required from the user at this stage. The payer admin will review the request and take a decision.
Approved — View Credentials
Once the payer admin approves the application, it moves to the Approved tab where the user can access credentials.
Approved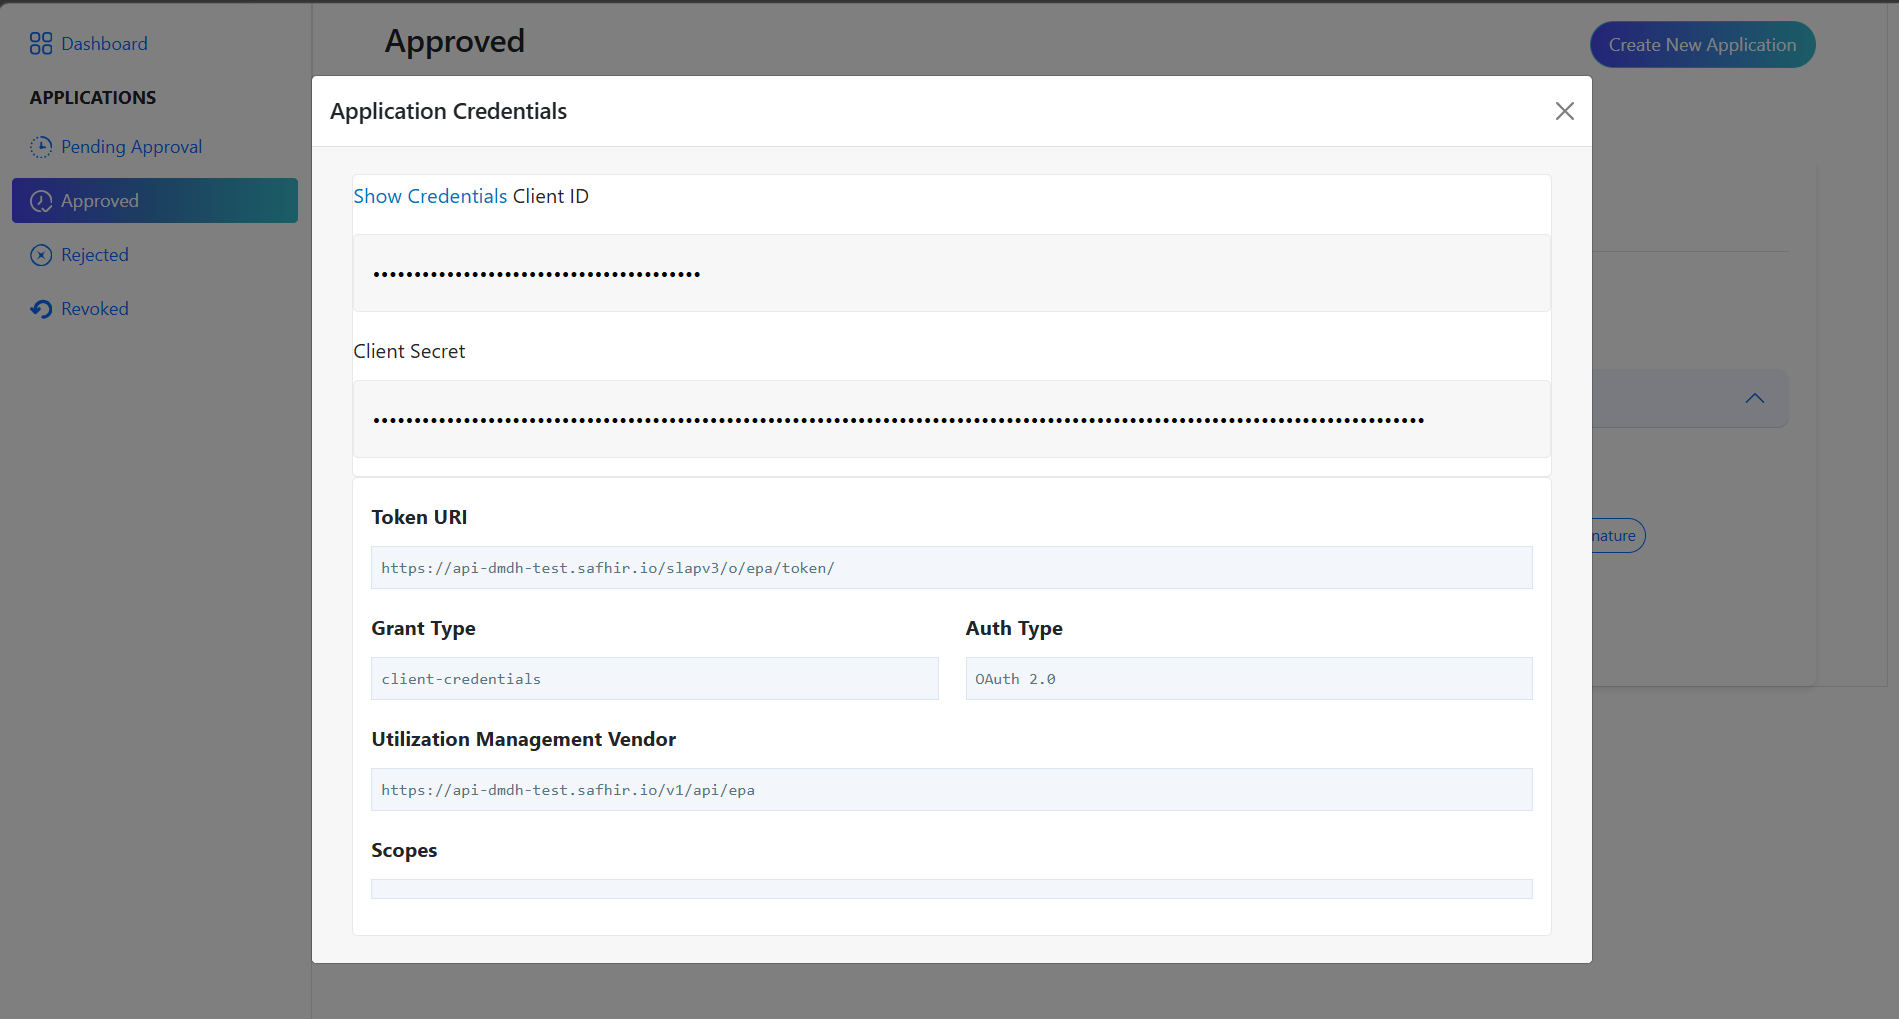
The application appears in the Approved tab. The user can click "Get Credentials" to view the application credentials needed to connect to the data provider.
Credentials are now available under the "Get Credentials" tab for this application.
Clone Application
From the Approved tab, the user can clone an existing application to create a new one of the same type without starting from scratch.
User action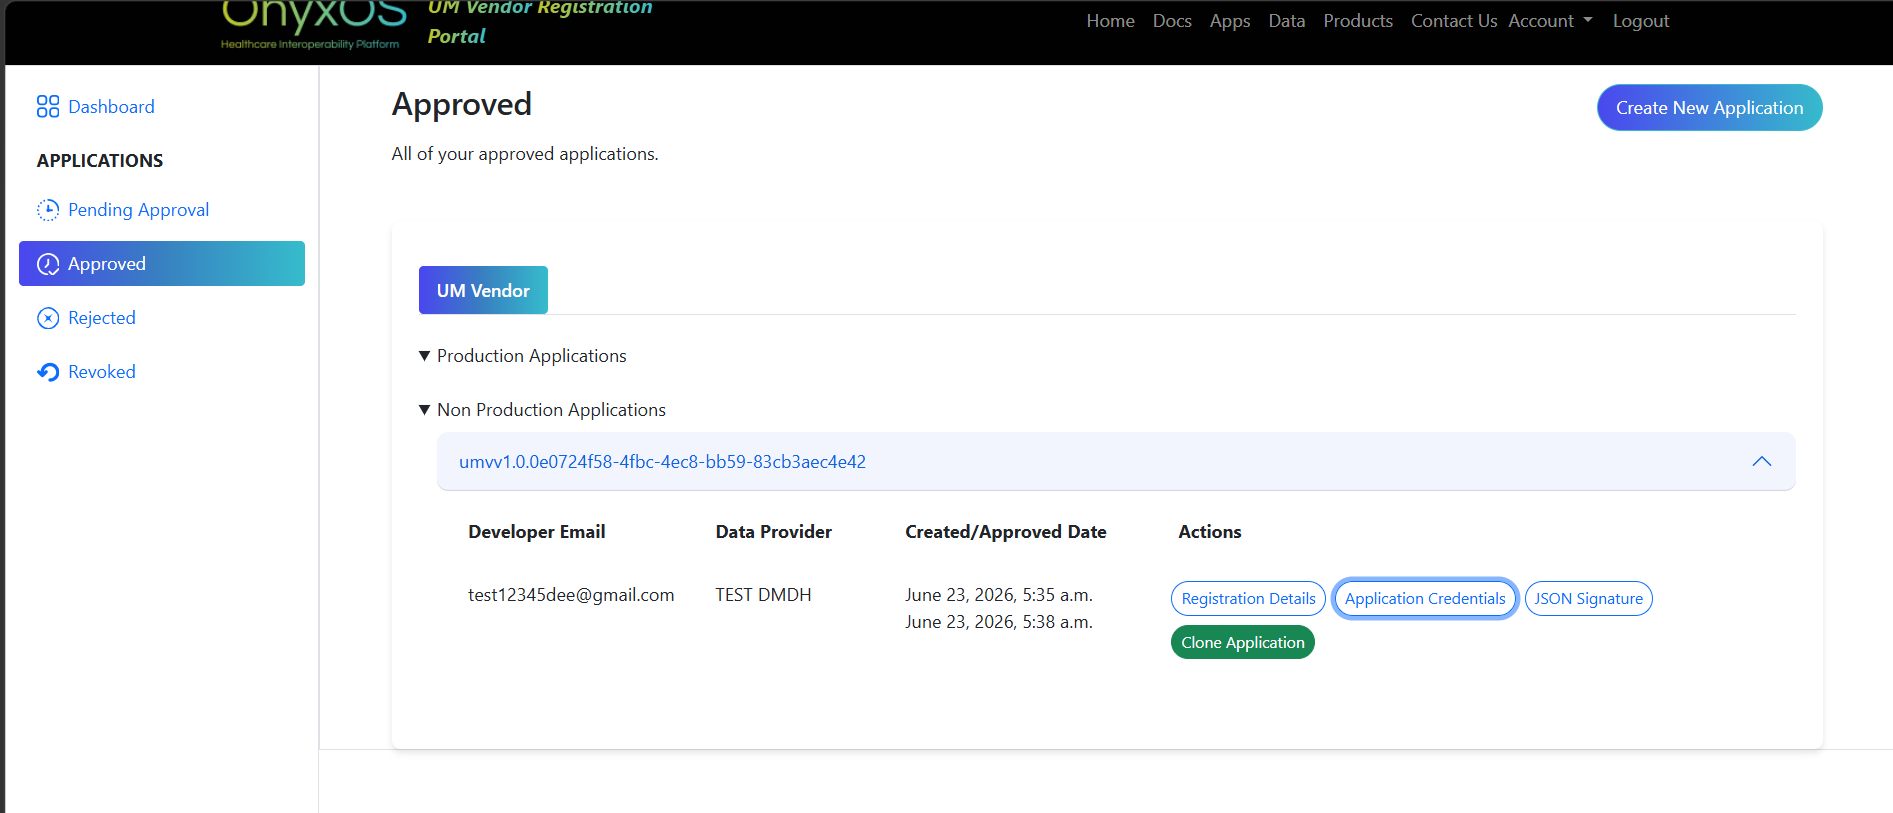
In the Approved tab, each application has a "Clone Application" button. Clicking it starts a new application creation flow pre-filled with the same details. The user follows the same steps as creating a new application — filling in application details, client details, and completing the access request.
Rejected or Revoked
If the payer admin rejects the application it moves to the Rejected tab. If a previously approved application is revoked it moves to the Revoked tab.
Outcome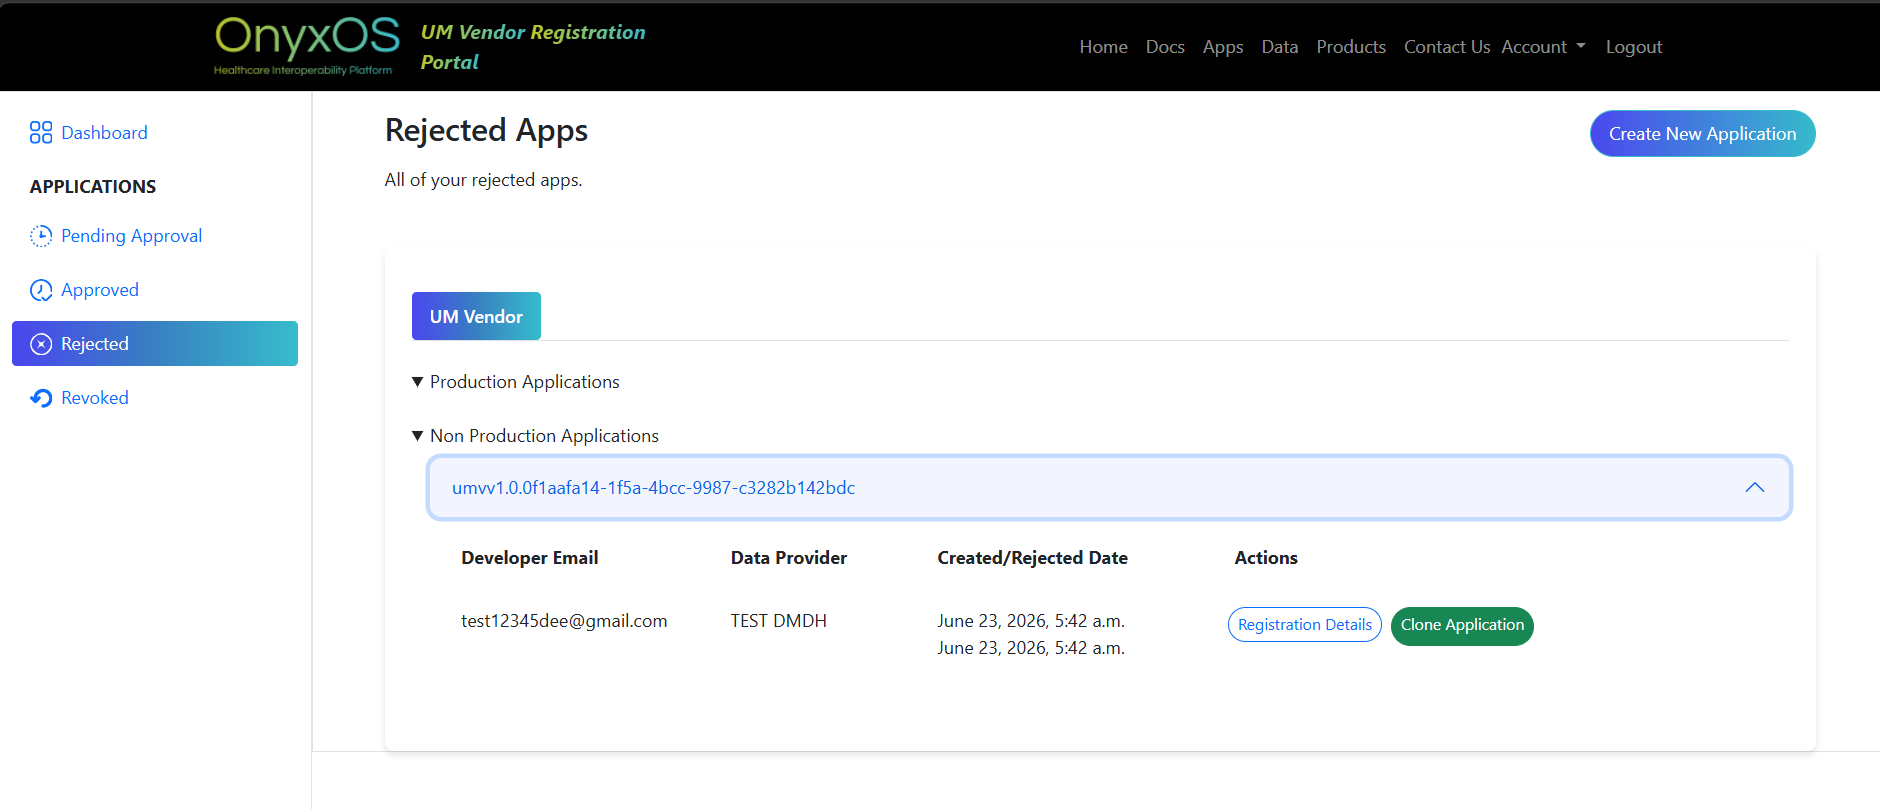
Applications that were not approved appear in the Rejected tab. Applications that were approved but subsequently revoked by the payer admin appear in the Revoked tab. Credentials are no longer accessible for rejected or revoked applications.